Media Digitalizer by Digitope can convert your cassette tapes, LP’s and other analog sources into a digital format. It is EASY! Your resulting output will be no better than your input. Digitalizer is simple to use and virtually painless; do read the tutorial (radical, but time well invested). This is a real-time process, and while the machines will do all the work, your presence is required. There are four main screens and here is a quick run through.
READ THIS SHORT INSTRUCTIONS...(THERE ARE NOT IN THE FILE)
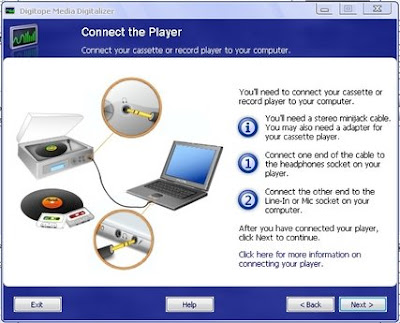
Hookup (how to connect to the what). You may need a wire or two from your electronic parts outlet. The program will advise you and identify exactly what you have. Review and connect your source. Start playing the cassette or LP or other source.
ADJUSTMENT (audio input levels). Once you are picking up the audio stream, click on the ADJUST button, and the system takes it from there. Let the program handle the adjustments; you may be asked to change the volume level. Make a trial run or two to get the feel of the product features.
Record type/time. Identify the type of recording you are doing. I opted for the MAX time session (200 minutes) knowing that cassette tapes often have dead spots at the end.
RECORD.OK, you have a valid audio input playing, all the adjustments have been made; now, re-set the cassette to the beginning. Press PLAY on the machine - press RECORD on the screen. The blue line will begin to jump when sound comes through your speakers and you are recording. When the last song finishes on side A, press PAUSE. Now, you have to do a Fast Forward on the cassette to the end of side A, then flip the cassette, press Play and get back and press RECORD again, to do side B. I found that the PAUSE button is a lot of trouble to mess with. When the end of side A is reached, I just did a Fast Forward on the cassette, flipped it and pressed Play. The program records a few extra clicks and bumps but this can be easily removed later. Press the STOP button when you reach the end of side B and that is it, for the recording of a cassette tape. Ditto for a two-sided LP record.
Shut down the source. You now have one big WAVE file on your hard drive. Press NEXT to move on.
Wave Conversion. The WAVE file, just captured is run through a basic analysis, processed and cut it into the obvious Tracks, unless you told it not too. Let the MEDIA DIGITIALIZE do it. It is faster than you are and the program does a nice job. Remember, we are talking real-time here. Otherwise, you have to manually intervene and cut the tracks apart, very time consuming.
TRACK EDIT . Look over the tutorial before you touch anything, it will be there on the right. All functions are described. If you prematurely exit this screen and it is not what you wanted to do, too bad.
Each TRACK and the noise between side A and side B will jump at you. You can move the edges of the tracks with your mouse pointer. You can just click and the track will play through your speakers. You can combine tracks, delete a track and block out sections of noise very easily. Review your choices before you move on. You will be asked to confirm, remember there is No Re-entry.
CONVERSION(to digital). Before you do the format conversion, you might want to take the opportunity and name the tracks, artist, and album; this is the place to enter that data. Next select the final DIGITAL format you want your edited tracks converted into; WMA, MP3 (set kbps), and CDA.You can burn a CD directly or save the output to a folder.
Final (exit screen). Select: repeat the process, make another CD or exit the program.
Media Digitalizer is well done, and it does deliver. I burned several 25+ year old cassettes to a CD with good results
Click Here to download


No comments:
Post a Comment